Image

Make your web browser as text editor , have ever wondered making your wb browser as text editor?
IF not then follow this simple tutorial on making your web browser as text editor.

1. Open your browser.
2. Type the following in the url bar.

data:text/html, <html contenteditable>

3. Now hit enter,  your web browser will acts as text editor.
4. That’s it!!!!

VLC Media Player Trick

Posted: May 4, 2013 in Uncategorized

Image

Most of the people does not now what is vls media player trick. If you know no body will search for this trick.mostly you end up here because you are searching for that trick. So forget about that lets get in to this trick.

1. Open VLC media player.
2. Press CTRL + N in your VLC media player and type the following

 Screen://

3. Click on play , trick will be working !!!!

Image

Hacking people is really fun , only thing is to target the user and get the passwords. This is too main stream for hackers. So in order to hack the passwords, we should know some knowledge about the coding stuff. So forget all these now start hacking  and stop blabbering.

Now hacking the people who are using roboform right? What is roboform?
Roboform is an application which is used for storing the passwords and the details of the users.
If you want to know more about the roboform , please google about it , i have no patience to explain about it 😉
So if you serach the following query in google the list of the roboform files wil appears there for you can extract the deatils of the users.

1. Open up Google.
2. Type the following in the query.

“My RoboForm Data” “index of”

3. Now get the Roboform files.
4. That’s it!!!!

Image

In the following tutorial i will show you how to enable god mode in your windows machine.
By enabling god mode you will have complete access to the windows settings. To enable this god mode follow this tutorial.

1. Right on your desktop free space.
2. create new folder and rename the folder with the following name.

God Mode.{ED7BA470-8E54-465E-825C-99712043E01C}

3.  After renaming the following folder now open the following folder , now god mode will be enabled on your computer and you can access every setting in the windows.

First, create satu new empty folder dan bagi lah nama kepada folder tu ikut suka kamu. Dlm tutorial ni sy bagi nama folder tu as ‘xiaopan’~

Image

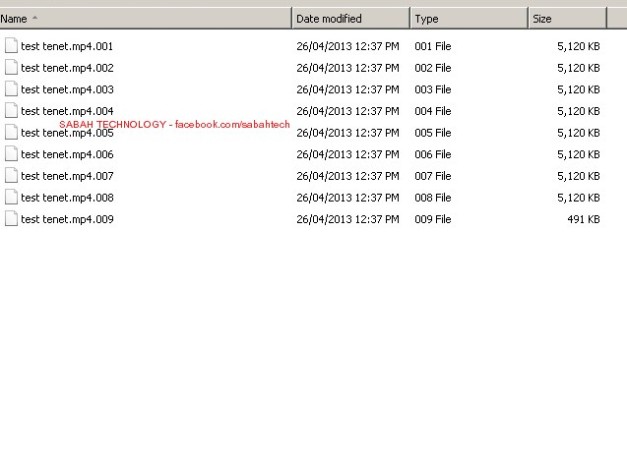
Then letak semua files yg perlu di-combine-kan dlm folder tu…

Image

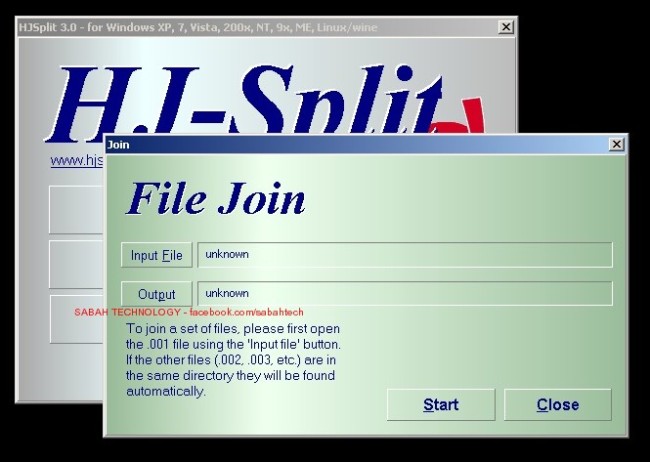
Now, run (double click) software HJ Split

Image

Click Button ‘JOIN’,

Image

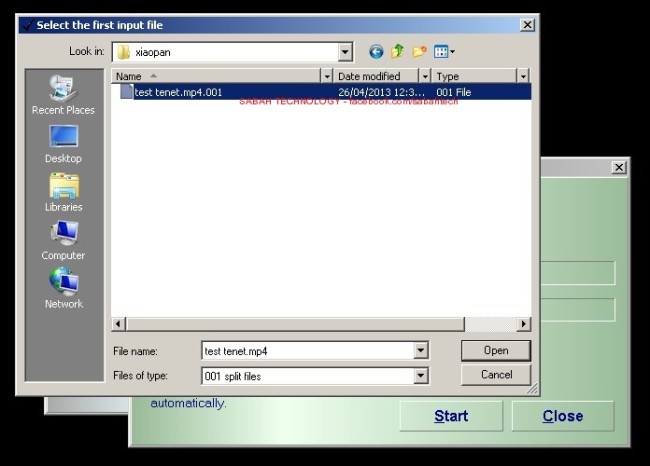
Click button ‘input file’ and Cari folder ‘xiaopan’, then kamu akan jumpa satu file sahaja iaitu file yg mempunyai ‘001’ as extension file~ click file tu then hit button ‘open’….

Image

Image

Image

Now, click START.. once process completed.. akan pop up satu dialog box ‘Join Complete’. Lepas tu masuk balik folder xiaopan, then kamu akan nampak satu file baru hasil gabungan beberapa file tadi. CONGRATULATION! YOU’VE DONE! Open it! 🙂

Image

Honestly I really don’t understand how this could happen, I mean this is just “Four Digit” and you have to confirm it twice. If someone is not “high”, I don’t think it’s possible to forget (you have to put it in each five minute, come on!). I read in Apple support forum, sometime it could happen as software bug, mainly after an iOS update. Whatever here I will show you guys some workaround on what to do if you lose your iPhone passcode.

iPhone Wrong Passcode

Though title says only iPhone but this discussion also works for iPad, iPhone Touch and iPad mini too. And here I am trying to share what I learned from my experience and research. I don’t take responsibility whatever happens to your device. Please read carefully and try to understand your device condition.

Here we will stick to really working process, and I will quote from Apple support thread and their guideline. I will not go for any old or Jailbroken process. To clarify you will find a lot of guide and tutorial saying you could get the password, by using an Mac/Windows application, called iPhone Backup Extractor. This application still works for extracting other type file, but not for recovering your passcode. Apple did change iOS internal file storing process, also they did change their encryption process. So starting from iOS 5 this application does not work for passcode recovery. And process specially for Jailbroken device, like getting into device internal file system using SSH or WinSCP and try to read .plist file to find password, is very risky and troublesome task for most user, so I will avoid those.

Must Know Facts:

1. Even for running restore, if you have recent backup (backup with passcode enabled), you will still need passcode. It will give you this error message.
iTunes could not connect to the [device] because it is locked with a passcode. You must enter your passcode on the [device] before it can be used with iTunes.

2. According to Apple, officially there is no way to recover your Passcode without a complete restore.

Some Magical Process:

Remember the iPhone Lockscreen bug? According to our report those bug was present prior to iOS 6.1.3 and even still present in latest iOS 6.1.3. Does not required any Jailbreak or anything. So here I could find two easy process to bypass lockscreen, without any software. You should try those process first. If somehow magically any of those process works for your device, then you could get into your device without knowing password. And these process should work on old firmware as well. Try your luck.

1. iOS 6.1 Trick Allows Bypassing iPhone Lockscreen

2. Another iOS 6.1.x Passcode Vulnerability Found

Try both process, serially, and have patience, as both process require few try. And remember if you somehow by any of these process you got into your device, you will still need passcode to even change passcode. So, if you could get into your device you should try restore process described below, as now backup and restore will work.

Restoring Process:

I want to divide this process in few section depending on scenario.

1. If you have recently Synced to your computer
If you have access to the computer which you used recently to sync your this iPhone or iDevice, then you should follow the process below.
a) Connect the device via USB with computer. Open iTunes.
b) Right-click the device in the left column in iTunes and select Restore.
c) Now the tricky part, you have to select such a restore point, when you are sure, you knew the passcode. This helps, when you by mistake change passcode to something you cant remember or your device got disabled for too many try.

2. If have “Find My iPhone” setup and use iCloud

If you have “Find My iPhone” setup, then you could try the process below. BTW if you don’t have recent backup via iCloud you will loose your data.

Do the remote Wipe first. From Apple support (KBPH2701)
a) Sign in to icloud.com/find using your Apple ID (the one you use with iCloud).
b) Click Devices, then select the device you want to erase.

c) In the device’s Info window, click Erase Device.

d) Make sure your device is online, the remote erase begins within seconds and a confirmation email is sent to your Apple ID email address.

Now Restore from iCloud Backup
After your device is completely erased remotely, now in the device setup wizard choose “Restore from iCloud Backup” and enter your iCloud account and password. You will see the three most recent backups for each of the devices on which you enabled Backup. Choose which backup to restore from. (Ref: KBHT4859)

Again you have to know the passcode of the backup you are restoring, or you have to use this device without restoring any content, just as new. BTW if you have all songs, apps, movies download in your computer you could sync separately later. Though you have to setup all setting, including your Wireless/ WiFi setup, but its not that bad when you loose all access to your device. Fresh start is good sometime.

3. When you dont have Backup or “Find My iPhone”
This is obviously the worst case scenario, and our last process. (Ref: KBHt1212)
Now there is no way to save your data and setting, and even normal restore will not work for you, as iTune will always ask for Passcode before proceeding to restore. Here is your workaround.
1. Don’t connect the USB cable to the device, but connect the other end of the cable to your computer’s USB port.
2. Turn off the device: Press and hold the Sleep/Wake button for a few seconds until the red slider appears, then slide the slider. Wait for the device to turn off.
3. While pressing and holding the Home button, reconnect the USB cable to the device. The device should turn on.
4. Continue holding the Home button until you see the “Connect to iTunes” screen. When this screen appears, release the Home button.
5. iTunes should alert you that it has detected a device in recovery mode. Click OK, and then click Restore to restore the device.

You should also read:
1. Restoring iOS software

I have spend several days finding and testing all possible solution and organize them according to possible scenario. So, if I have been able to help you, please share your experience with in the comment section below, it should not take more then a minute. And if something went wrong while following my guide, lets us know that too, so I could look more and find a solution of that issue. It will help others.

# Originally by Tech Journal #

Image

BitLocker is a lesser-known technology included in Windows that allows you to both password protect and encrypt the contents of your storage mediums.

Note: BitLocker requires Windows 8 Pro.

Turning On BitLocker for a Removable Drive

Open explorer and right click on your removable drive to open the context menu, then click on Turn on BitLocker.

Image

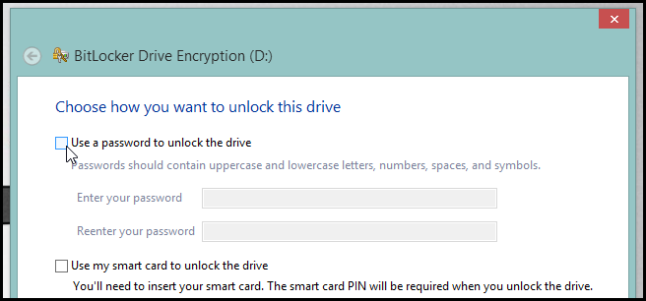
When the wizard starts up you will need to check the “Use a password to unlock the drive” checkbox.

Image

Then go ahead and type in a password and click next.

Image

Now you will need to choose where you want to save the recovery key incase you forget the password for your drive. Usually you would only be able to either print it or save it to a file, however starting with Windows 8 you can also back it up to your Microsoft account, which I chose to do.

Image

You then have to choose whether your drive is already in use or if it is new. Then click next.

Image

Finally, you can click the Start encrypting button.

Image

Image

Unlocking the Drive

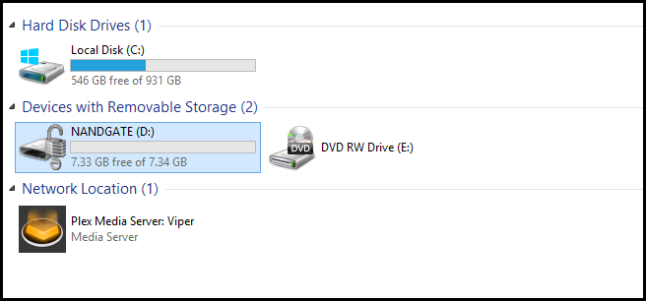
When you plug in the encrypted drive you will get a notification saying that it is BitLocker-protected.  Click on it.

Image

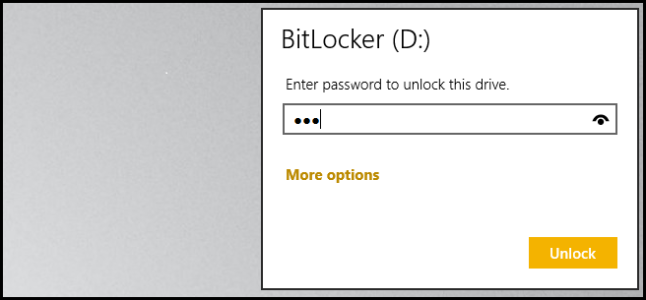
You will then be asked for the password. Once you have typed it in, click on the Unlock button.

Image

That’s all there is to it.

Image

Instragram

Freeing your photos from Instagram requires the use of a secondary website – it is not a service provided by Instagram. Instaport enables you to download your entire account as a zip file, and there are plans to also allow data to be transferred to Facebook or Flickr.

Image

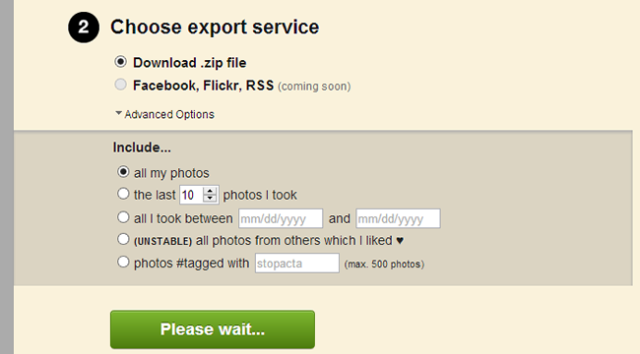
Visit the Instaport website and click ‘Sign in with Instagram’ before providing authorizing the connection to your account. Make sure that ‘Download .zip file’ is selected and click the Start Export button.

This time around you’ll have to keep checking back to the page to see when your archive is ready as no confirmation email is sent out. Just how long this will take depends on how many images you have uploaded.

If you want to get more specific about the images you want to download rather than just grabbing the whole lot, click the Advanced Options link to access additional settings such as images from a certain time frame.

Image

Google+

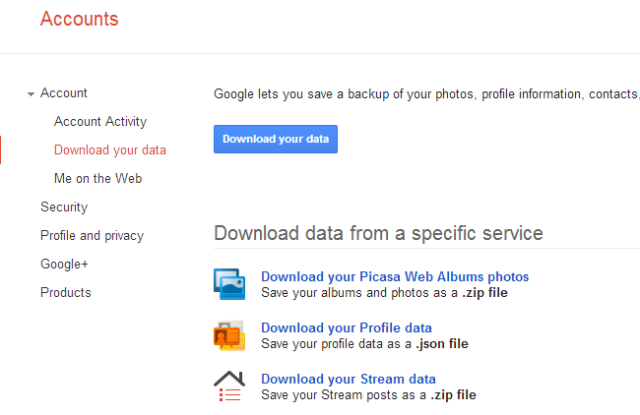
To download your Google+ data, log into your account, click your profile picture to the upper right of the page and then click Account.  You have the choice of downloading all of your Google data – everything from Picasa albums to Google Voice data – in one fell swoop, or you can download different archives individually.

Image

To keep things simple and download everything at once, click the ‘Download your data’ button. This will take you to Google Takeaway where you’ll need to enter your password again. You can go ahead and move to the ‘Choose services’ section to select individual services to download data from if you like, but otherwise just click Create Archive.

Image

Twitter

Downloading your Twitter archive is similarly simple. Log into your account, click the gear icon to the upper right of the page and then click Settings. Scroll down to the bottom of the page and click the ‘Request your archive’ button in the ‘Your Twitter archive’ section.

Image

As with Facebook, you’ll have to wait a little while for the archive to be prepared, so click the Close button and await the arrival of the confirmation email – in all likelihood this won’t take too long to arrive. Click the ‘Go now’ button in the email

Image

Click the Download button to grab your tweets.zip archive, which you can then extract using your tool of choice. Twitter archives are provided in both HTML and CSV formats.